Tutorials
Please view our tutorials by clicking the following two links.
How to Create Your Free Personal Profile:
https://youtu.be/Tmwp2vEWLK0
How to Take a Course Using Your Recert Subscription:
https://youtu.be/kyGuiTztoZI
Using Recert to Track Your Recertification Progress
Prehospital recertification requirements are constantly evolving and can be difficult to track. Recert is an online continuing education service designed to make meeting prehospital recertification requirements more efficient. Recert offers engaging courseware mapped to a personalized recertification roadmap.
User-friendly dashboards help you manage your professional portfolio, while keeping you focused on what’s important—your training.
Viewing Your Recert Dashboard
1. After you log in via psglearning.com or jblearning.com, click the RECERT tab on the My Account page to view the Recert Dashboard.
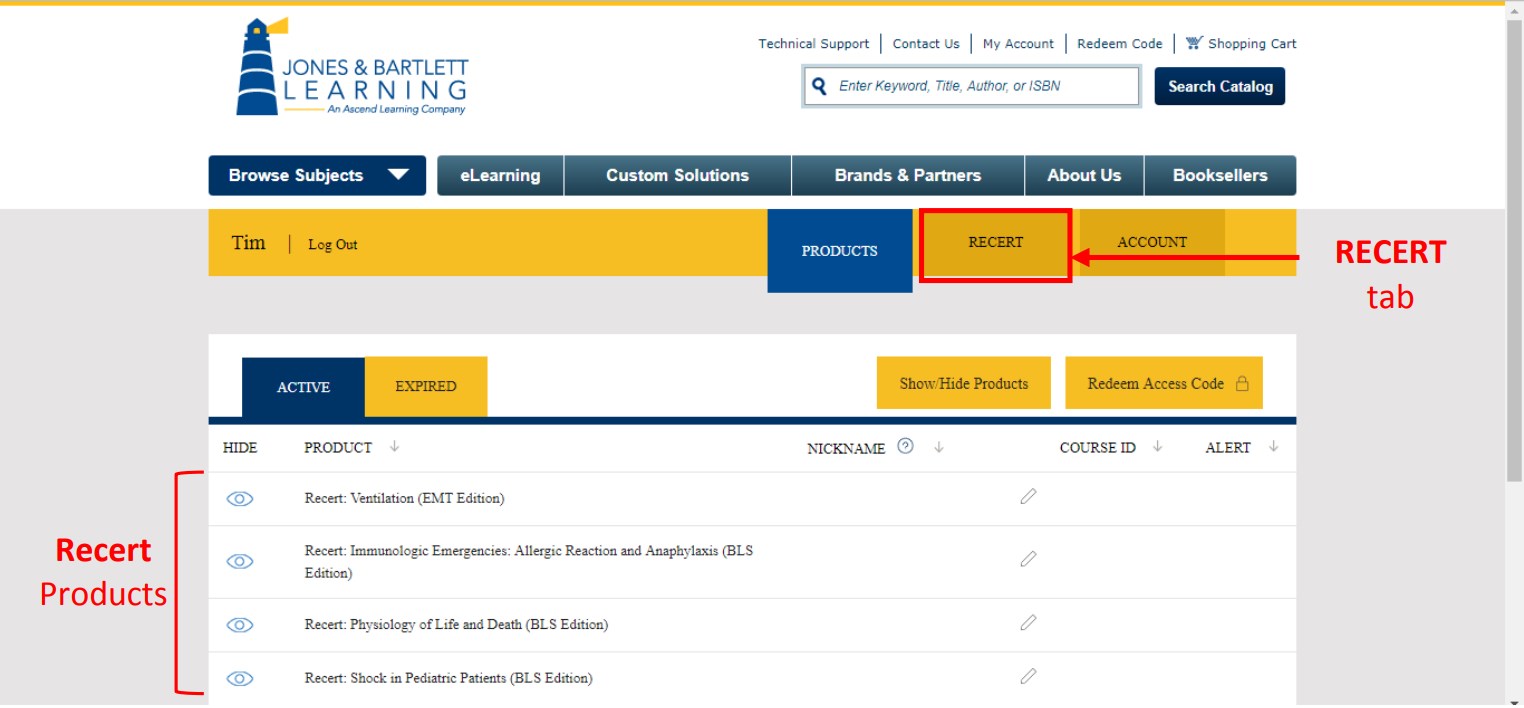
The Recert Dashboard displays your progress towards recertification.
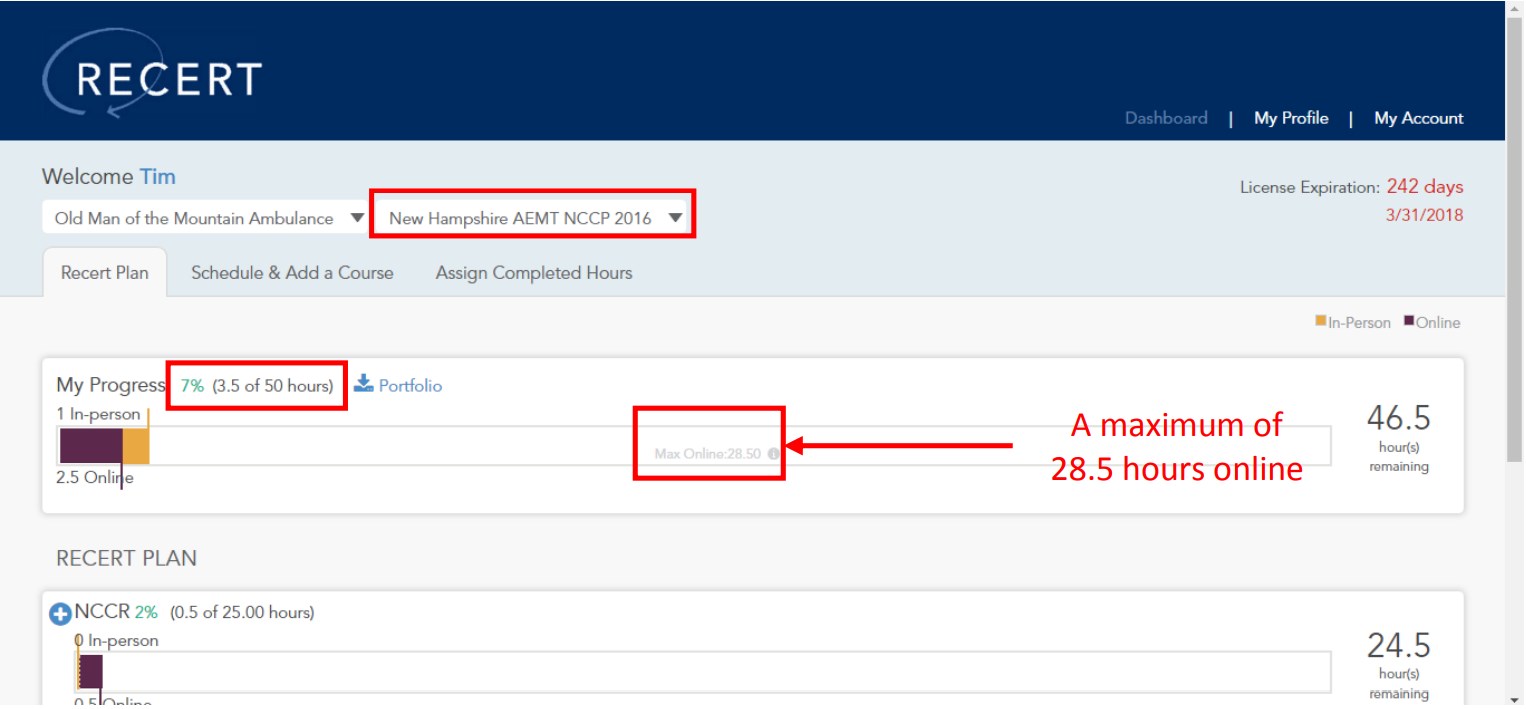
In the example above, “Tim” has completed 7% of his required hours, or 3.5 out of 50 hours required for his New Hampshire AEMT recertification. Note that hours can be fulfilled either online or in-person, although there is a limit to how many hours you can receive from online training. For example, 28.50 of Tim’s 50 recertification hours can be completed online.
Note It is up to the user to find and complete the training necessary for recertification. Courses are available via the Jones & Bartlett Learning Public Safety Group’s Recert course library, but you can also schedule a “non-Recert” course, which is any course or activity that helps to fulfill your recertification requirements.
Adding a Non-Recert Course
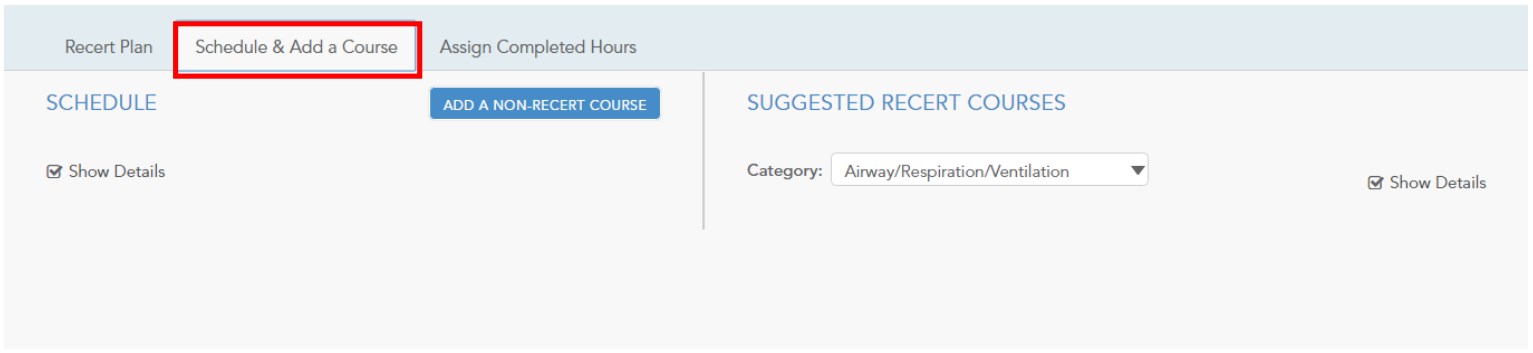
1. To add a non-Recert course, from the Recert Dashboard, click the Schedule & Add a Course tab.
2. To the right of SCHEDULE, click the ADD A NON-RECERT COURSE button. A dialog box opens, where you can enter details about the course.
3. In the Add a Non-Recert Course section, fill in the following fields. Note that fields marked with an asterisk (*) are required.
- Course Name*
- Duration*
- Start Date*
- Start Time
- End Time
- Instructor
4. In the Address Details section, provide the course’s location (if desired).
5. In the Course Details section, click the Category list arrow and select a category—for example, Cardiovascular.
Note The Recert interface is contextual, which means the categories and topics that display will vary based on the state and certification information in your profile. In the example shown below, the category and the topic lists are based on recertification requirements for a New Hampshire AEMT NCCP 2016 recertification.
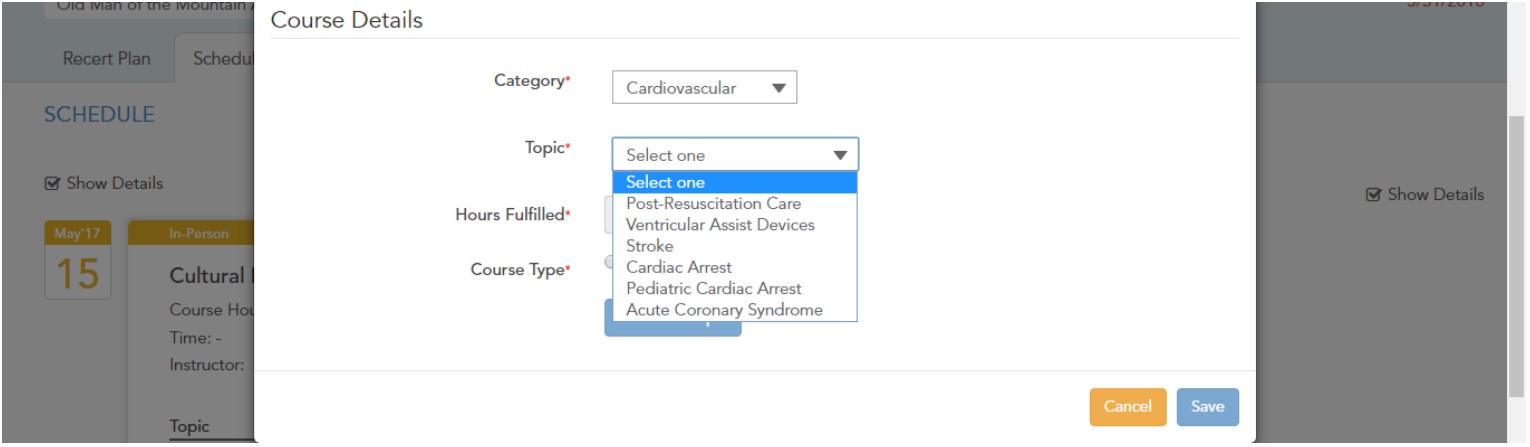
6. Click the Topic list arrow and then select a topic. Once you select a Topic, Recert displays the following message: Recertification requirements may vary by state, region, or agency. You are responsible for confirming that specific continuing education courses and activities satisfy your requirements.
Note It’s your responsibility to confirm which continuing education courses meet your individual recertification requirements, as they may vary by state, region, or agency.
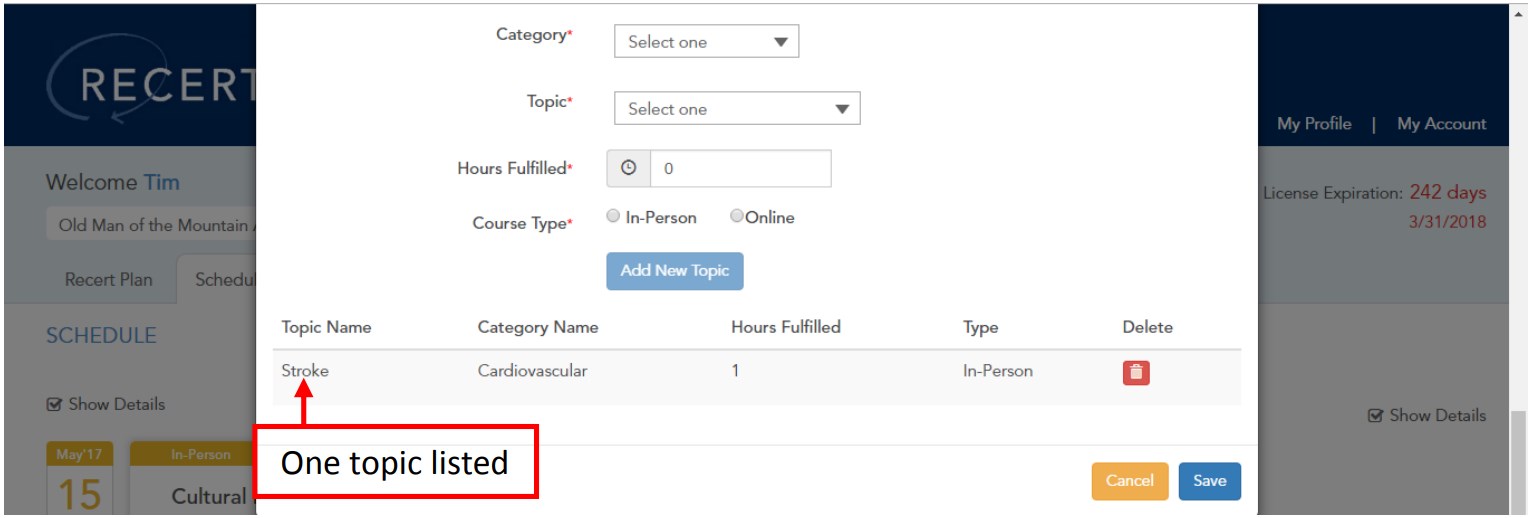
7. Enter the Hours Fulfilled, which is the number of continuing education hours you would like to designate for the selected topic.
Warning If you type a number greater than the maximum required fulfilled hours for a topic, Recert displays a warning message.
8. Select the Course Type: either In-Person or Online.
9. Click the Add New Topic The course, with one topic, appears at the bottom of the dialog box.
10. To add another topic to the course, repeat steps 5 through 9, above.

11. Repeat until you have entered all of the desired course details (categories and topics).
12. Click the Save
Recert redisplays the Schedule & Add a Course tab on the Dashboard. Note that at this point, you have only scheduled the course. You have not indicated that you have completed the course.
13. To mark a course as complete, click the blue MARK AS COMPLETE button.
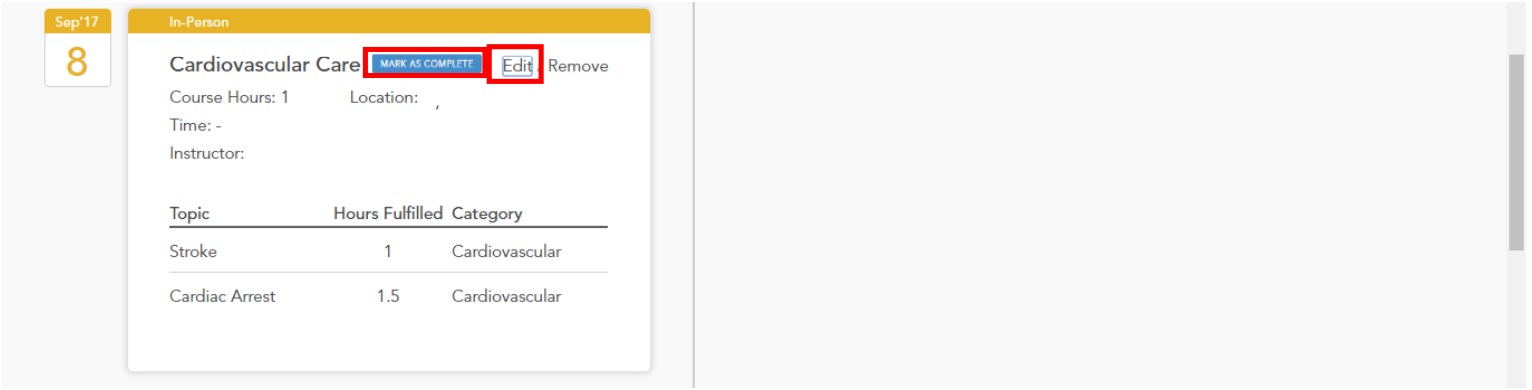
14. You can alternatively mark a course as complete within the Edit a Non-Recert Course screen. Click Edit on the top right corner of the In-Person course.
15. In the Edit a Non-Recert Course screen, click the Mark as Complete check box.
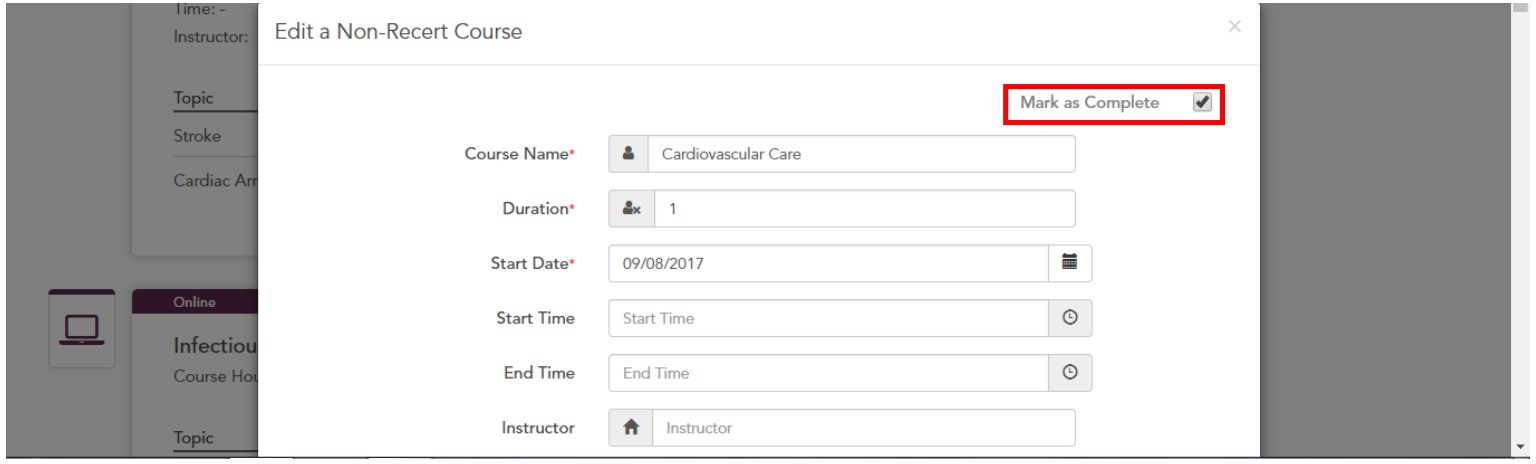
16. At the bottom of the dialog box, click the Save button.
Note Some recertification requirements require verification of skills competency. For these topics (with a skills component), you need to upload proof that you have demonstrated competency in the related skill before the course hours will display in your Recert dashboard. If a non-Recert course is used to fulfill a topic with a skills component, marking the non-Recert course as complete is not sufficient. You must also upload a skills verification sheet.
Uploading Skills Verification and Obtaining a Certificate
Uploading Skills Verification
For topics with a skills component, you will need to uploaded proof of skills competency before the completed course hours will display in your Recert dashboard.
Note If a topic requires verification of skills competency, you will need to upload proof of skills competency, regardless of the source of the course hours. This applies to hours both from non-Recert courses as well as Recert courses.
1. From the Dashboard, click the Recert Plan tab to display your recertification progress.
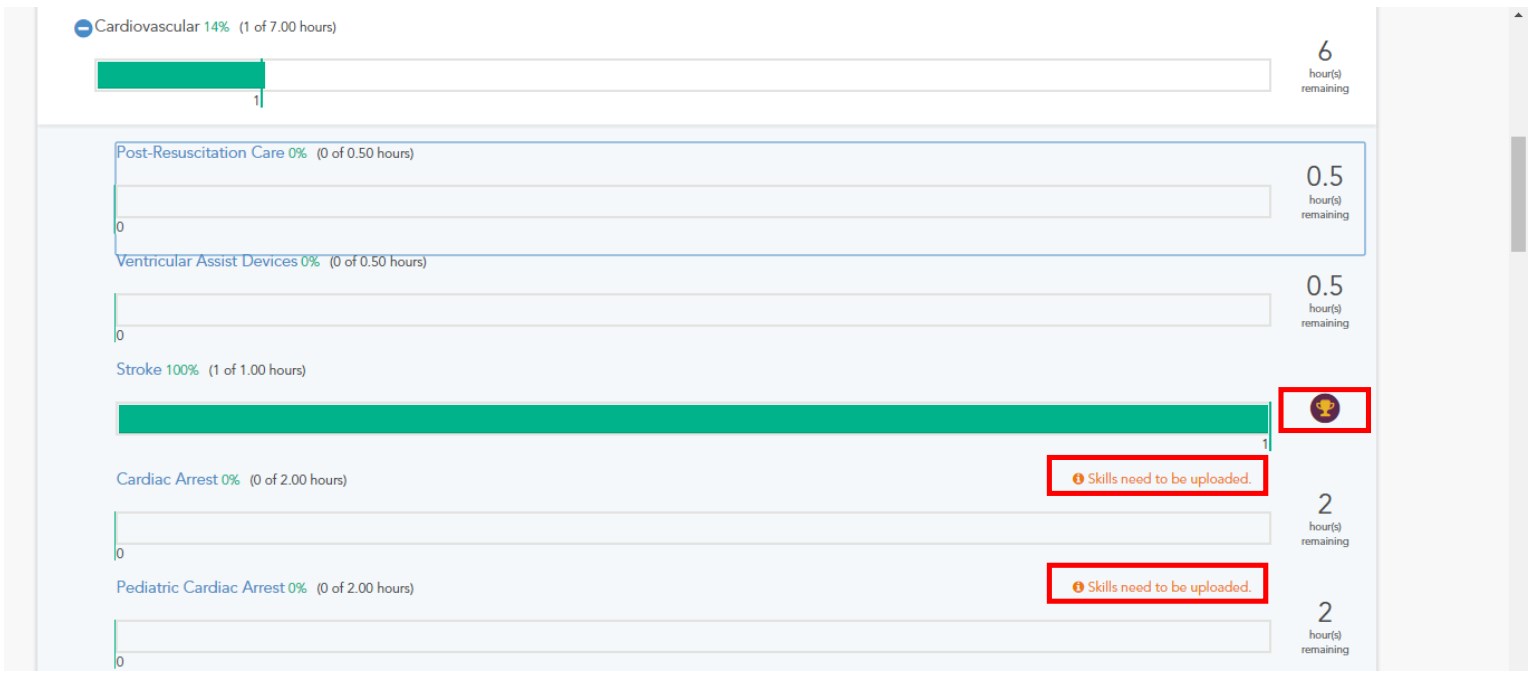
2. Expand the category and topic for the course you just added by clicking the plus sign to the left of each level until the topics are displayed. Topics for which you have not yet provided proof skills competency of are flagged with the words “Skills need to be uploaded.” In the example below, Cardiac Arrest and Pediatric Cardiac Arrest still need proof of completion. Topics that have been completed are flagged with a trophy icon. In the example below, the Stroke topic is 100% complete.
- Click the topic name for any topic that has a Skills need to be uploaded message.Recert displays a dialog box that allows you to upload proof that you have demonstrated competency in the skill. If you have the necessary digital file, skip to step 6.
- Click Download Skill Template to download a PDF file that you can print and have signed by your training officer or medical director.
- Scan or take a picture of the proof of skills competency and store it on your computer.
- Click the Upload Skill
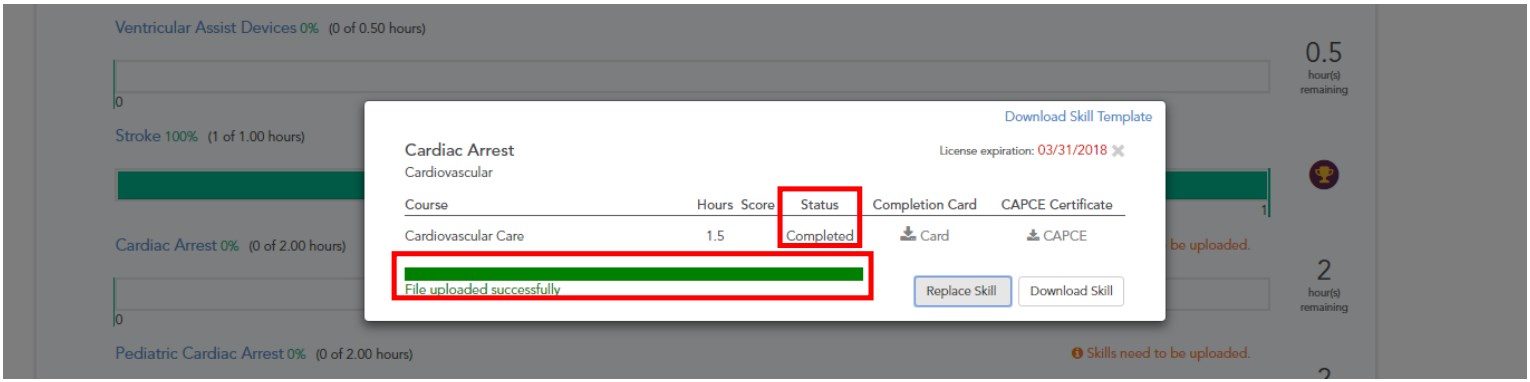
- In the Open dialog box, select the file and then click Open. Recert displays a message indicating that the file has been uploaded successfully, and changes the Course status to Completed.
Obtaining a Completion Card or CAPCE Certificate
Once you have completed a course and uploaded skills verification (if required), you can obtain a certificate indicating that the requirements for that topic have been completed.
- Click to download a Completion Card, or click to download a CAPCE Certificate.
Acquiring a Recert Course
- From the Recert Dashboard, click the Schedule & Add a Course tab.
- Under SUGGESTED RECERT COURSES, click the Category list arrow and select a category from the drop-down menu.
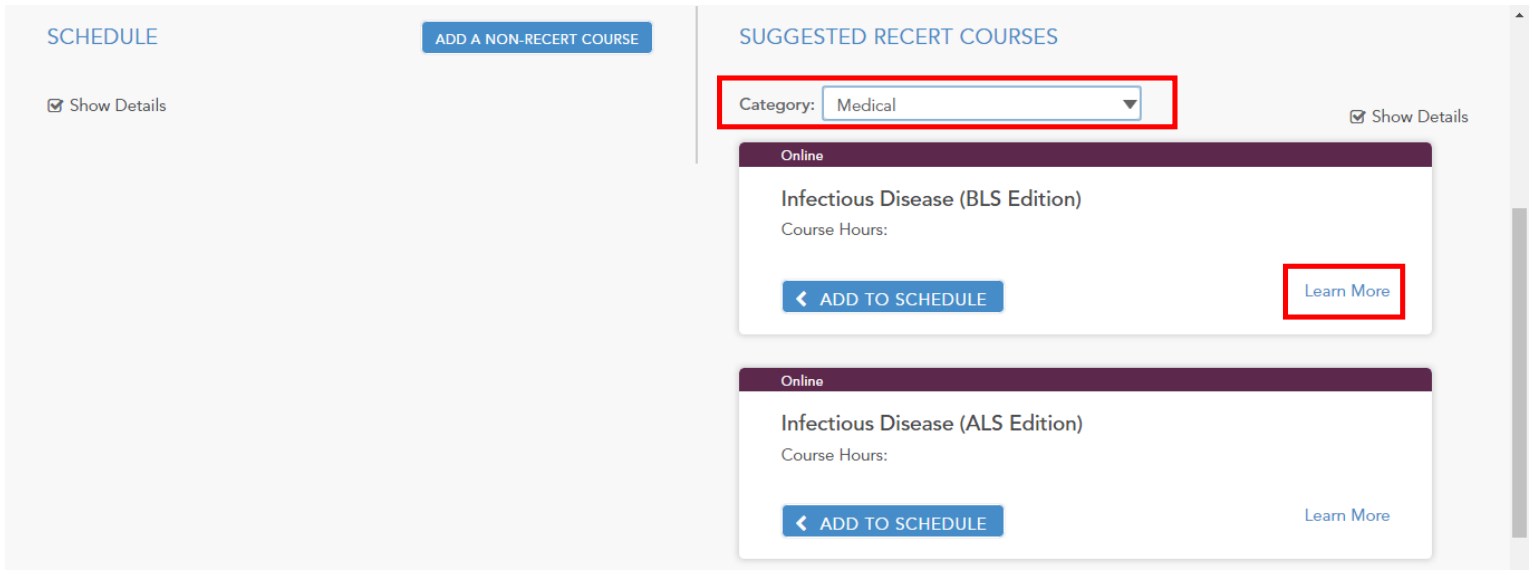
For example, if you select Medical, the Dashboard displays a list of the courses offered in the Medical category.
Note You may need to scroll down to see all of the courses in the selected category.
Acquiring a Course with a Recert Subscription
If you have a Recert subscription, follow these steps:
- Click Learn More in the lower right-hand corner. A product page for the Recert course opens in a new browser tab. The page displays course’s description, ISBN, and cost. By default, the Quantity value is 1 and the price is $6.95.
Note As a Recert subscriber, you will not be charged for any Recert courses that you add to your account. - Click Add to Cart.
- Click Checkout.
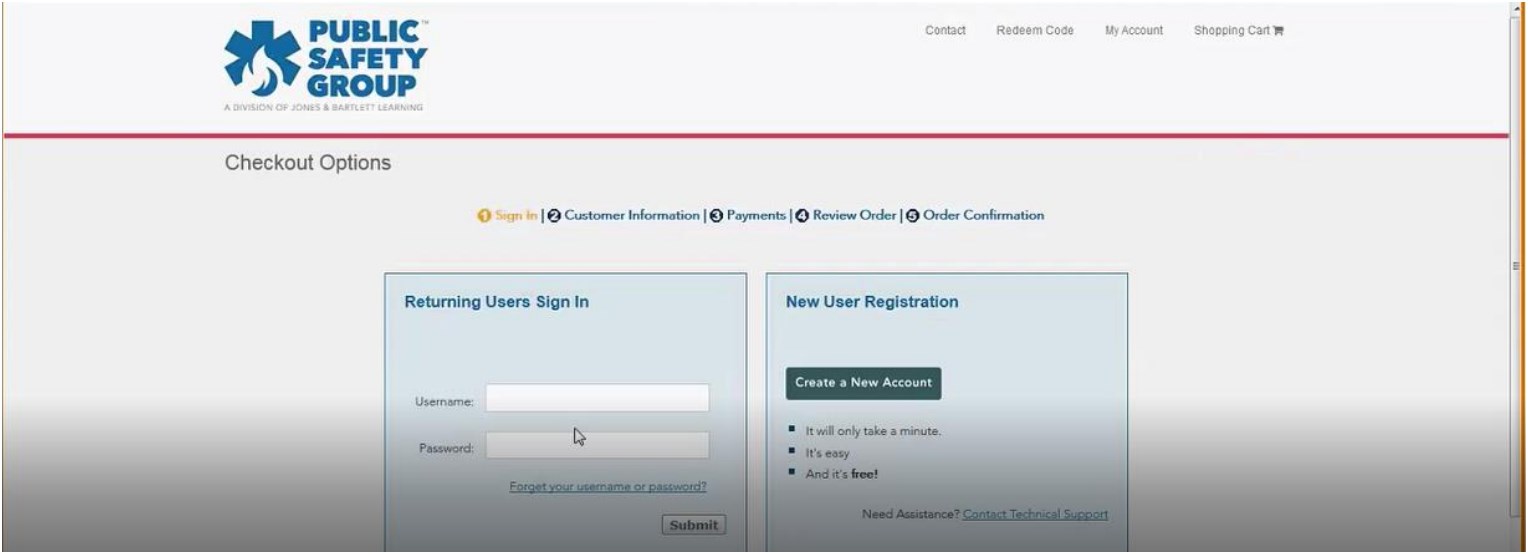
- Enter your login information (user name and password) on the Checkout Options screen.
- Click
- The Checkout - Customer Information screen displays a message indicating that you are a Recert Click the checkbox to the left of the course(s) that you want to add to your account.
- Click Add to My Account.
The course should now appear in the PRODUCTS tab of the My Account screen.
Acquiring a Course without a Recert Subscription
If you don’t have a Recert subscription and plan to purchase individual Recert courses, follow these steps:
- Click Learn More next to the course name. A product page for the Recert course opens in a new tab. The page displays course’s description, ISBN, and cost. By default, the Quantity value is 1 and the price is $6.95.
- Click Add to Cart.
- Click Checkout.
- Fill out the fields on the Checkout - Customer Information screen.
- Click Continue
- Choose a payment method. Note that you can use credit card or a purchase order.
- Enter the information, and then click Use this payment method.
- Review the Order Summary screen, and then click Complete checkout.
The course should now appear in the PRODUCTS tab of the My Account screen.
Taking a Recert Course
Taking a Recert course involves three steps:
Complete the CE Activity Submit the Post-Test
Submit the CAPCE Survey
Note Course hours will not display in your dashboard until you complete all three steps. If the Recert course satisfies a topic with a skills component, skills verification must be uploaded as well.
- To launch the course, click the course name on the PRODUCTS tab of the My Account screen, and then click the LAUNCH
- Click Launch to launch the CE Activity.
- Click Launch Module.
When you have finished reviewing the module, you’ll see a Module Completed screen.
- Click Close Module, and then click OK to confirm that you want to close the module. A green checkmark appears next to the CE Activity.
Note You can’t launch the Post-Test until you’ve completed the CE Activity.
- To launch the Post-Test, click Launch.
- Click Attempt Assessment Now.
- Answer the questions, clicking Next to move through the test.
- Click Submit all and finish. A green checkmark appears to the right of the Post-Test.
Note You can’t launch the CAPCE Survey until you’ve done the Post-Test.
- Click Launch to the right of CAPCE Survey.
- Click Answer the questions.
- Respond to the questions in the Survey.
- Click Continue to return to the Dashboard and assign your hours.
Assigning Hours
After you have completed a Recert course, Recert displays a message about assigning hours.
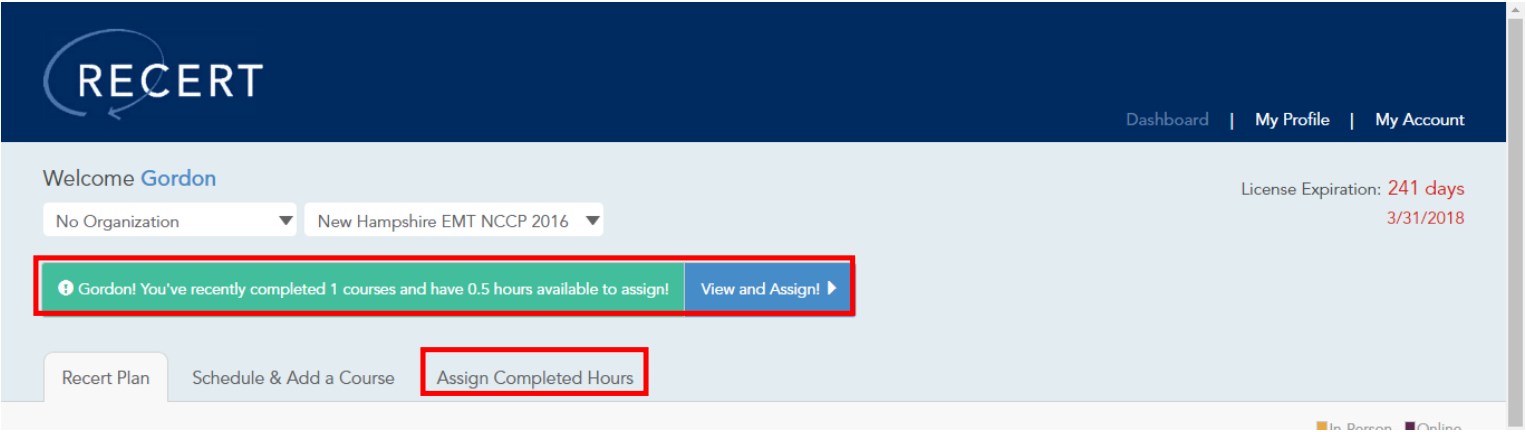
- Click View and Assign. The Dashboard displays the list of COMPLETED COURSES.
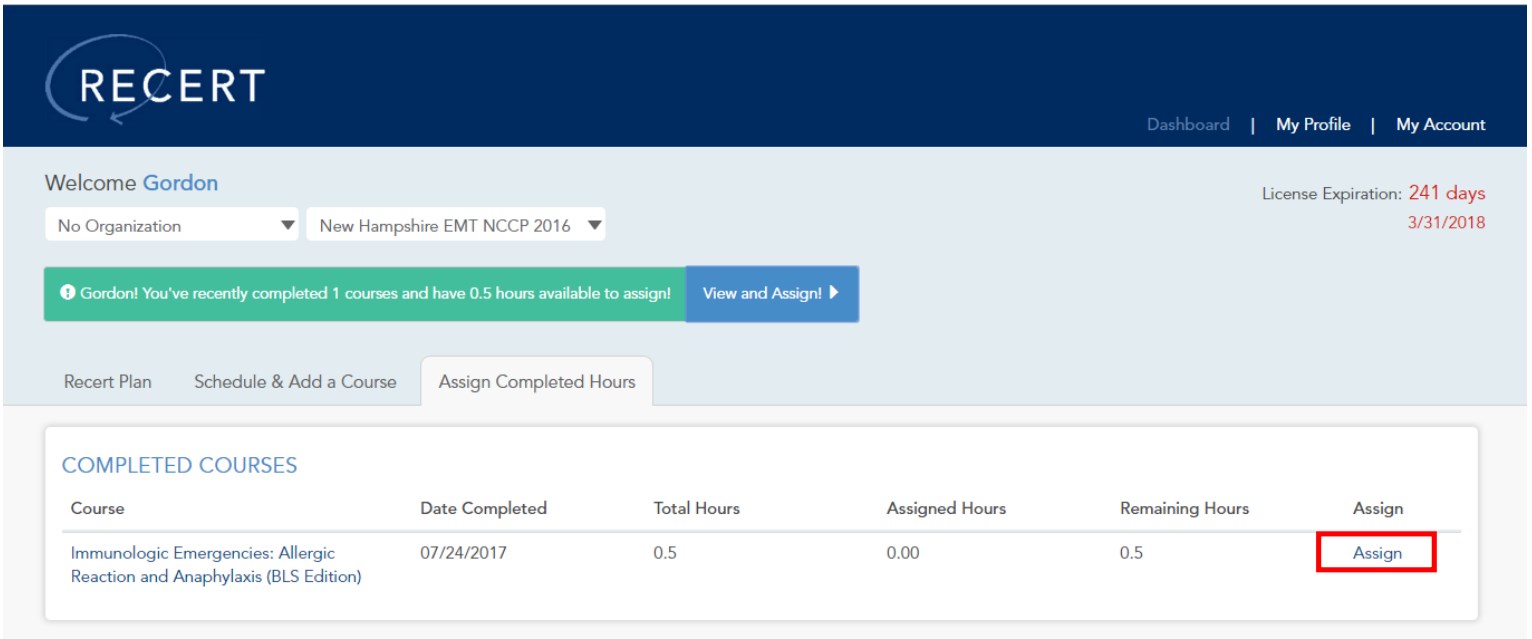
- Under Assign, click Assign.
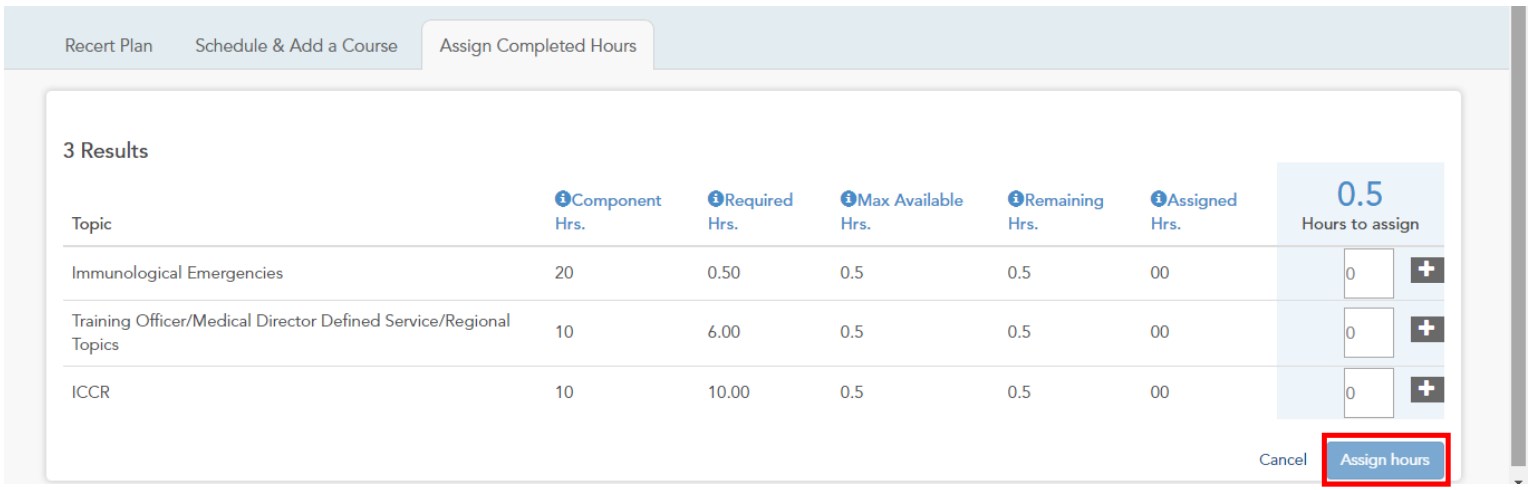
The Dashboard displays a grid of Topics that you can choose from to assign the hours based on your recertification model.
- Click a plus sign under Hours to assign.
Recert may display a message that explains that recertification requirements may vary by state, region, or agency. Again, it’s your responsibility to determine what specific courses and activities will satisfy your requirements. Recert may also display a message that explains that in order to receive actual credit for topic with a skills component, you will need to upload a valid skill verification form that has been reviewed by your training officer or medical director.
- Click OK.
- Use the plus sign (+) to assign continuing education hours (in half-hour increments) to the topics of your choosing.
- Click Assign hours.
Recert displays the Recert Plan tab of the Dashboard. Note that although you’ve assigned hours, you may not yet see them listed on this screen. If the topic has a skills component, you must upload a skill verification in order for any assigned hours to be counted and to display on this screen.
Adding a Certification
When you first set up your account, you must indicate on the My Profile screen what certifications you hold so that Recert can keep track of your progress based on the recertification model you select.
- On the My Account page, click the RECERT tab and then click My Profile.
- Under CERTIFICATION(S), click Add New Certification.
A CERTIFICATION form appears at the bottom of the screen.
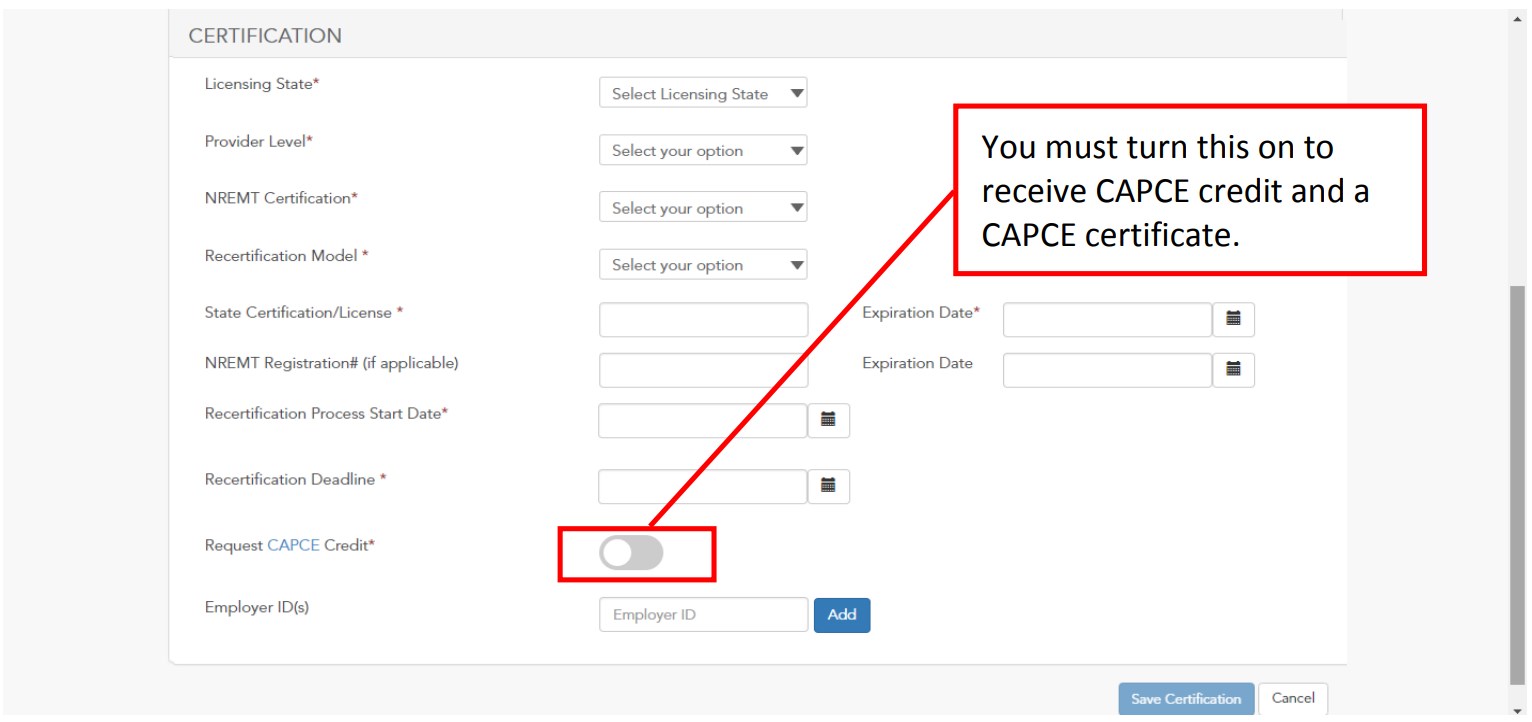
- Enter the following information. Note that fields marked with an asterisk (*) are required:
Licensing State: This is the state where you actually practice. Note that you can practice in multiple states, and if you do, you have to add multiple certifications.
Provider Level: EMT, AEMT, or Paramedic.
NREMT Certification: Select Yes if you have an NREMT Registry #.
Recertification Model: Select the appropriate model.
License/Certification Number: Enter your license/certification number.
State Certification License and Expiration Date: If you have a state license or certification, enter the number and its expiration date.
NREMT Registration # and Expiration Date (if applicable): If you have a NREMT Registration number, enter the number and its expiration date.
Recertification Process Start Date: This is the date for which Recert will begin to track your progress.
Recertification Deadline: This is the date by which you much complete your recertification.
Request CAPCE Credit: You must turn on this option when you add your certification in order to receive CAPCE credit. Some states require CAPCE credit; some states don’t.
Employer ID(s) A sales rep should have set up an employer ID for your employer. You must enter this number so that your employer can view your progress towards recertification. If you work for multiple employers, add their employer IDs by clicking Add.
- When you have finished filling out the CERTIFICATION section, click Save Certification. If you have an additional certification, click Add New Certification and repeat steps 3 and 4.
Obtaining a CAPCE Certificate
You can download and print a CAPCE certificate by following these steps. Note that you must turn on the Request CAPCE Credit option when you add a new certification.
Associating Your Account with an Employer ID
When you set up your certification, you have the option to associate your certification with an Employer ID. See Adding a Certification.
Using Recert to Track Your Employees
As an employer, you can use Recert to track your own recertification as well as the recertification progress of your employees.
- Log in to your account and click the RECERT
- Click the arrow to the right of View as and then click Employer, if necessary.

- To see employees based on their models, click the list arrow next to the current model, and then click a model.
A list of employees whose certification is based on the current model is displayed.
- Click the plus sign (+) to the left of an employee’s name to see the details of his or her progress.
Note Click the minus sign (-) to hide the details.
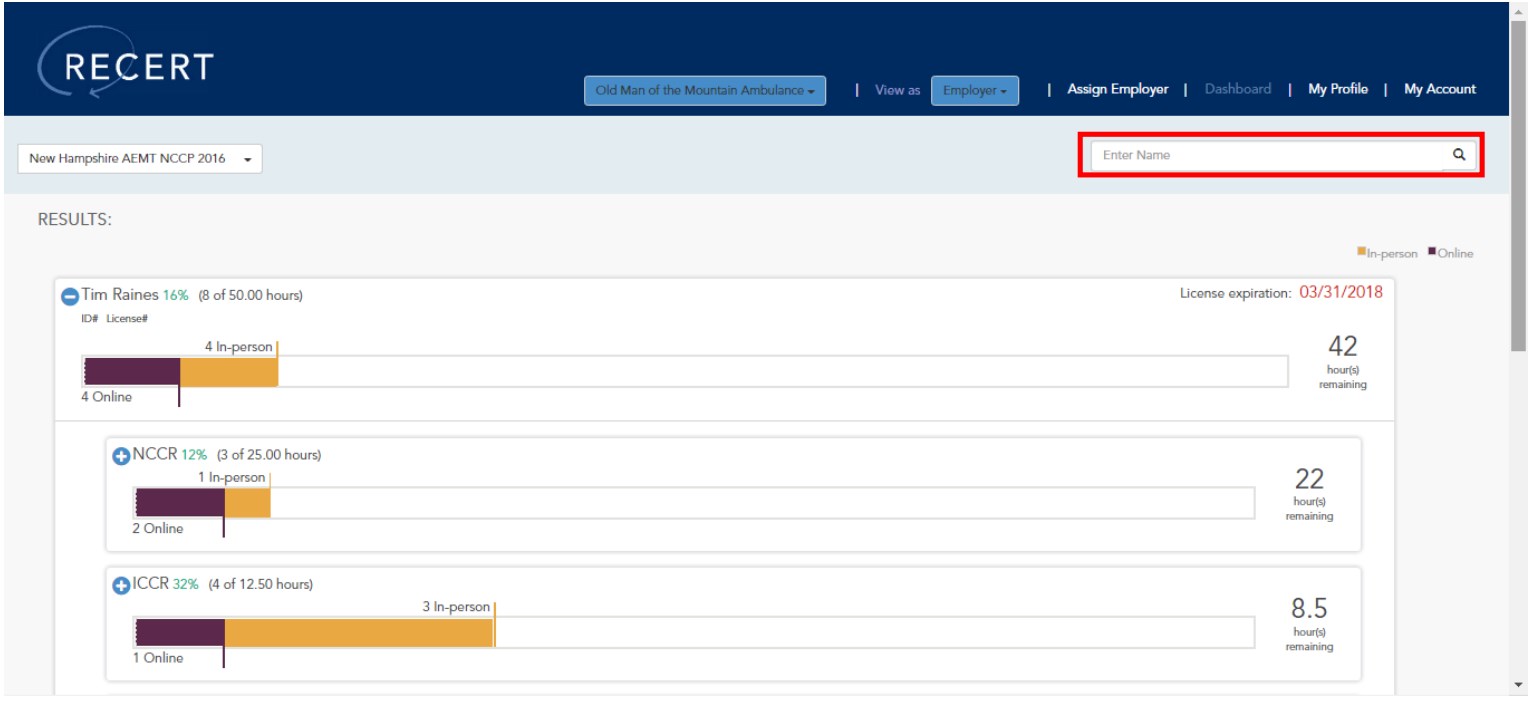
Note If you have a large number of employees, you can use the Search box on the top right side of the screen to search for the employee by name.
Assigning Employer Status to an Employee
You have the ability to make an Employee an Employer in order to give him or her access to the data you see as an employer by granting that employee Employer permissions.
- Click Assign Employer to the left of Dashboard.

- Click the check box to the left of the employee you want to promote to Employer status.
- Click the Add
Note: To remove Employer status for an employee, click the check box next to the name, and then click the Remove button.
